
Preparing not to work is a lot of work…
In today’s world, it’s not all too uncommon to hear about someone you know quitting their job to travel. Whenever I heard this or saw it on social media, I always wondered what that person had to do in order to prepare for the seemingly never-ending trip. I pondered this often because I felt like I personally had way too many responsibilities to tie up.
After over two straight years of watching others make my dream their reality I responsibly clicked pause on my domestic life.
Below I have listed the 10 steps that I took to not work responsibly. I hope that this blog can help those currently dreaming of traveling the world to realize that it can be done in a responsible manner!
Step 1: Break your lease. Or, sublease. Or, rent your home.
I put this as step one because this can be a financial deal-breaker for a lot of people and you obviously need to figure this out BEFORE you quit your job. Many apartments come with very strict leasing agreements that will only allow you to break your lease if you pay first and last month’s rent and then there are others that won’t let you break it at all. Depending on the terms of your lease, you can try to sublease your apartment, or even put it on Airbnb. You’re usually supposed to ask your landlord for permission, but I know a lot of people who do the “better to ask for forgiveness than permission” approach and just do it…

If you’re stuck in a lease there’s always a way out but it can definitely delay and/or cost you a lot. If you’re a homeowner just get set-up on a home rental site, (when I was homeowner I had a great experience with Airbnb). The ideal situation is that your lease is almost up, (which was the case for me), and then you can just move your possessions into a storage unit (read Step 7 for tips on this).
Step 2: Set a date & book outbound flight

I suggest reading the rest of this blog and then setting a departure based on how long you think these steps will take you. I can tell you from personal experience that all of this takes longer and costs more than you would think. Once you have your departure date set you can decide when it would make financial sense to take Step 3…
I just used Google Flights to find the cheapest one-way ticket to Auckland, New Zealand, but one of my friend’s told me that Scott’s Cheap Flights is good for getting deals on international flights, so I’m going to sign up for their Premium membership. I will update this blog as soon as I have some personal feedback.

Step 3: Quit your job 💸
“Jobs fill your pockets…
Adventures feed your soul.”
-Jaime Lyn Beatty
Unfortunately this is a necessary step for the majority of Americans looking to travel for longer than a month straight. You may want to consider not making this your third step, especially because the paychecks will stop shortly after giving notice. However, as most responsible working adults do, I wanted to leave on good terms, so I gave my last employer as big of a heads up as I could. I highly suggest always doing your very best to not burn a bridge – especially when that bridge can provide you with enough money to live. Who knows, they may even take you back when you return.
Step 3: See doctors / get vaccines 💉
I suggest going to see a few doctors before departing, especially if you’re traveling for more than a few months. Within a two week span I went to the dentist, general practitioner, eye doctor, OB GYN, dermatologist and a few different travel clinics. I’m kind of health freak, so this may seem overboard to some, but I also may be gone a whole year so I wanted to make sure everything was a-ok.
I also suggest having your general practitioner prescribe you some antibiotics to bring with you just in case you need them while you are traveling. For the record, I am anti antibiotics and always try to avoid taking them and I still got some to bring with me.
As far as vaccines go, I recommend consulting with a local travel clinic. You can let them know everywhere you plan on going and they will educate you on any/all risks involved with the areas you will be in. The first clinic I went to was Passport Health and while they were very professional, friendly and helpful, they were a good bit more expensive than the second clinic I went to — Denver Public Health, (which was just as nice). After receiving Typhoid and my second Hep-A at Passport Health, I decided to go to Denver Public Health for my two rounds of Japanese Encephalitis. I decided to get this vaccine because I will be going to Indonesia. The chance of a tourist getting infected with J.E. here is pretty low, so after considering the hefty price tag of ~$620 for the two shot series, most people decide to forego the vaccine. However, J.E. is transmitted through mosquito bites and I’m convinced that my blood is equivalent to mosquito heroine, and I’m paranoid, so I got it.
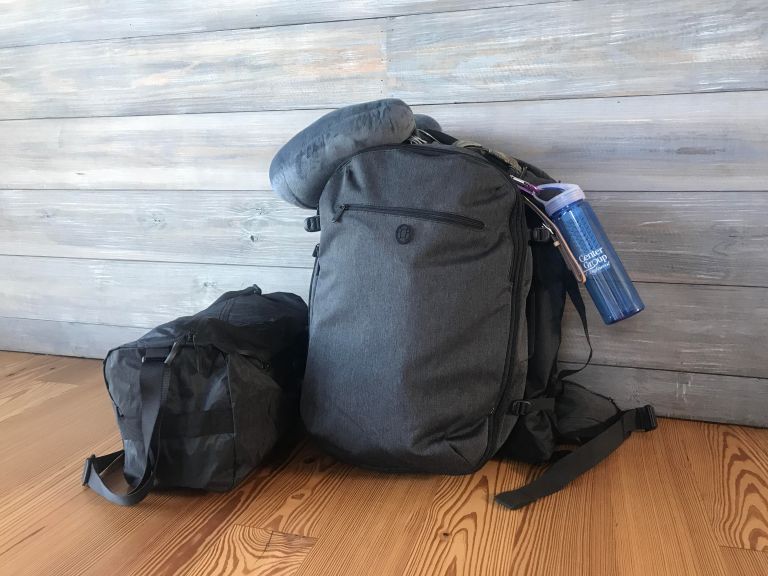
Step 4: Buy “backpacking essentials”

+water bottle & neck-pillow
- Backpack / suitcase: I decided I wanted to go the minimalistic route and just bring a backpack and small carryon. Per a friend’s suggestion, I went with a brand called Tortuga for both of these bags. I bought the Setout Backpack with the Setout Packing Cubes and the Outbreaker Duffle. I am going to be traveling with my Sony a6000 camera, so I really needed the extra duffle bag for that and my cosmetics bag. These backpacks are awesome because they open up like a traditional suitcase instead of forcing you to pack everything trash bag style, like the camping/mountain backpacks. I backpacked in Thailand with a standard camping backpack and it was pretty annoying to have to pull every single item out just to reach one item at the bottom of the backpack. Tortuga is a game-changer for the city backpacker.
- Locks for your backpack: I feel like this is a must if you’re staying in hostels. I have never stayed in one before and I will be staying in them on this trip, so I bought locks for my backpack zippers and a lock that will allow me to lock my bags to my bed. I am only going to stay in hostels that provide lockers, but even then sometimes you need your own lock for those too.
- Carbon Monoxide Detector: If you’re staying in hotels you probably don’t need to worry about this, but I found that a lot of Airbnbs and hostels do not have carbon monoxide detectors. This is actually really scary because if there is a carbon monoxide leak while you are sleeping you can die. This is the one that I bought on Amazon. I tested it by putting it by my car’s exhaust pipe and it worked. It’s also small and less than $18 vs. some that are over $100, so I feel good recommending it.
- Camera equipment: Most people will simply use their phone’s camera for pictures, but I had already purchased an Sony a6000 a year ago for WIMOs Associationso I’m finally going to put it to use. I’m working on some amateur photography skills and I’m going to try to get some good pictures of myself while I’m traveling, so I had to buy some camera equipment for solo travel: 50-inch Tri-Pod, 12-inch Gorilla Tri-Pod, Remote Control (better than a selfie stick), Extra batteries for the a6000 (because I heard the only bad thing about this camera is the battery life and I would be pissed if I lugged my camera out only to not be able to take a picture) and a lens cleaning kit. You’re also going to want to get some sort of lens cleaning solution too. Somehow all of this fit into a camera carrying case. I bought a random name brand because I figure it will draw less attention from thieves. You’ll want to use a carrying case with these dimensions if you’re going with the Outbreaker Duffle because this one fits perfectly in there and allows for extra room for things that I found necessary and listed below. If you’re not bringing a camera, you’re going to have a LOT more space in your duffle.
- Vitamin dispenser: I take a lot of vitamins, so I decided to order this dispenser so that I don’t have to worry about buying vitamins the first month, or so, while I’m traveling. This also fit into the Outbreaker Duffle. So far, it’s very convenient.
- Clothesline: This isn’t “essential” but it should save you a lot of time when it comes to drying a load of laundry. A lot of countries do not have driers, so this clothesline should come in handy.
- Security system: I will be staying in hostels and campervans throughout my trip, so my stepmom gave me the Doberman Security Portable Door Alarm. I could not find this exact one on the internet, but I did find something similar here on Amazon and it looks pretty much the same. I will definitely feel better having this while staying in a campervan. My dad suggested that I stop shaving and wearing deodorant to deter predators, but that’s his advice not mine…

Step 5: Utilize / sign-up for a travel credit card

If you are going to rent a car, get a credit card that covers rental car insurance. Even with a hefty annual fee you are going to save a ton of money in car insurance. You don’t HAVE to get insurance, but it’s the responsible thing to do. I have the Chase Ink Business Preferred credit card through an LLC of mine, so I am using that. Make sure that you book your rental car with the travel credit card in order to activate and ensure insurance coverage through that credit card. Here is a list of good travel credit cards that provide rental car insurance. Most of these even give you a generous amount of money/points towards travel once you’ve spent a certain amount on the card. Mine gave me $1,000!
UPDATE: While travel credit cards still come with loads of benefits, I now suggest still opting for the rental car coverage that at least covers the tires and wheels. I hit a curb on my third day which resulted in a flat and a little damage to my car’s rim only to find out that my credit card only covers damage to the body of the vehicle. I am upgrading to full coverage for the remainder of my trip.
Do not forget to notify your credit cards and bank(s) of which countries you will be visiting. Usually your credit card company will not shut it off when they see you booking your travels with the card before departing, but still…
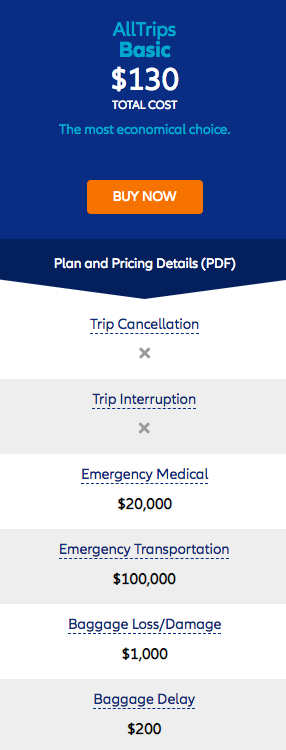
Step 6: International health and/or travel insurance

I highly suggest getting travel/health insurance of some sort. In some countries, if you don’t have emergency transportation insurance they will not transport you unless you give a massive amount of cash up front, (and most people cannot pony up that kind of cash at a moment’s notice – especially in a foreign country. Per my well-traveled stepmom’s recommendation, I went with Allianz and purchased the “AllTrips Basic” plan and it was only $130 and covers all of my trips. It covers major events, like emergency evacuation, but not things like trip cancellation and interruption. Below is some of the emergency evacuation language in my policy and an outline of my personal “AllTrips Basic” plan -each individual’s plan price may differ.
Emergency Evacuation (Transporting you to the nearest appropriate hospital)
If you become seriously ill or injured or develop a medical condition while on your trip and we determine that the local medical facilities are unable to provide appropriate medical treatment:
- Our medical team will consult with the local doctor;
- We will identify the closest appropriate hospital or other appropriate facility, make arrangements to
transport you there, and pay for that transport; and - We will arrange and pay for a medical escort if we determine one is necessary.
Step 7: Pack your backpack (and duffle)
For obvious reasons, you’ll want to do this before storing your stuff. Honestly, this part might have caused me the most anxiety because I didn’t think I’d be able to fit everything that I thought I needed – and I was right. I will be in New Zealand and Australia during their Fall/Winter, which gets kind of chilly, so that made packing a little more stressful than if I were just going to visit warm and tropical climates. I was NOT able to fit a hair dryer in the backpack, which is pretty unfortunate for my extremely straight bangs, but I’m going to get through it.
If you’re anything like me, you’re not going to feel ready for Step 8 until you are able to fully zip up your bag(s) with all of your ‘necessities’ in them. Then it’s go-time…
Step 8: Store your possessions
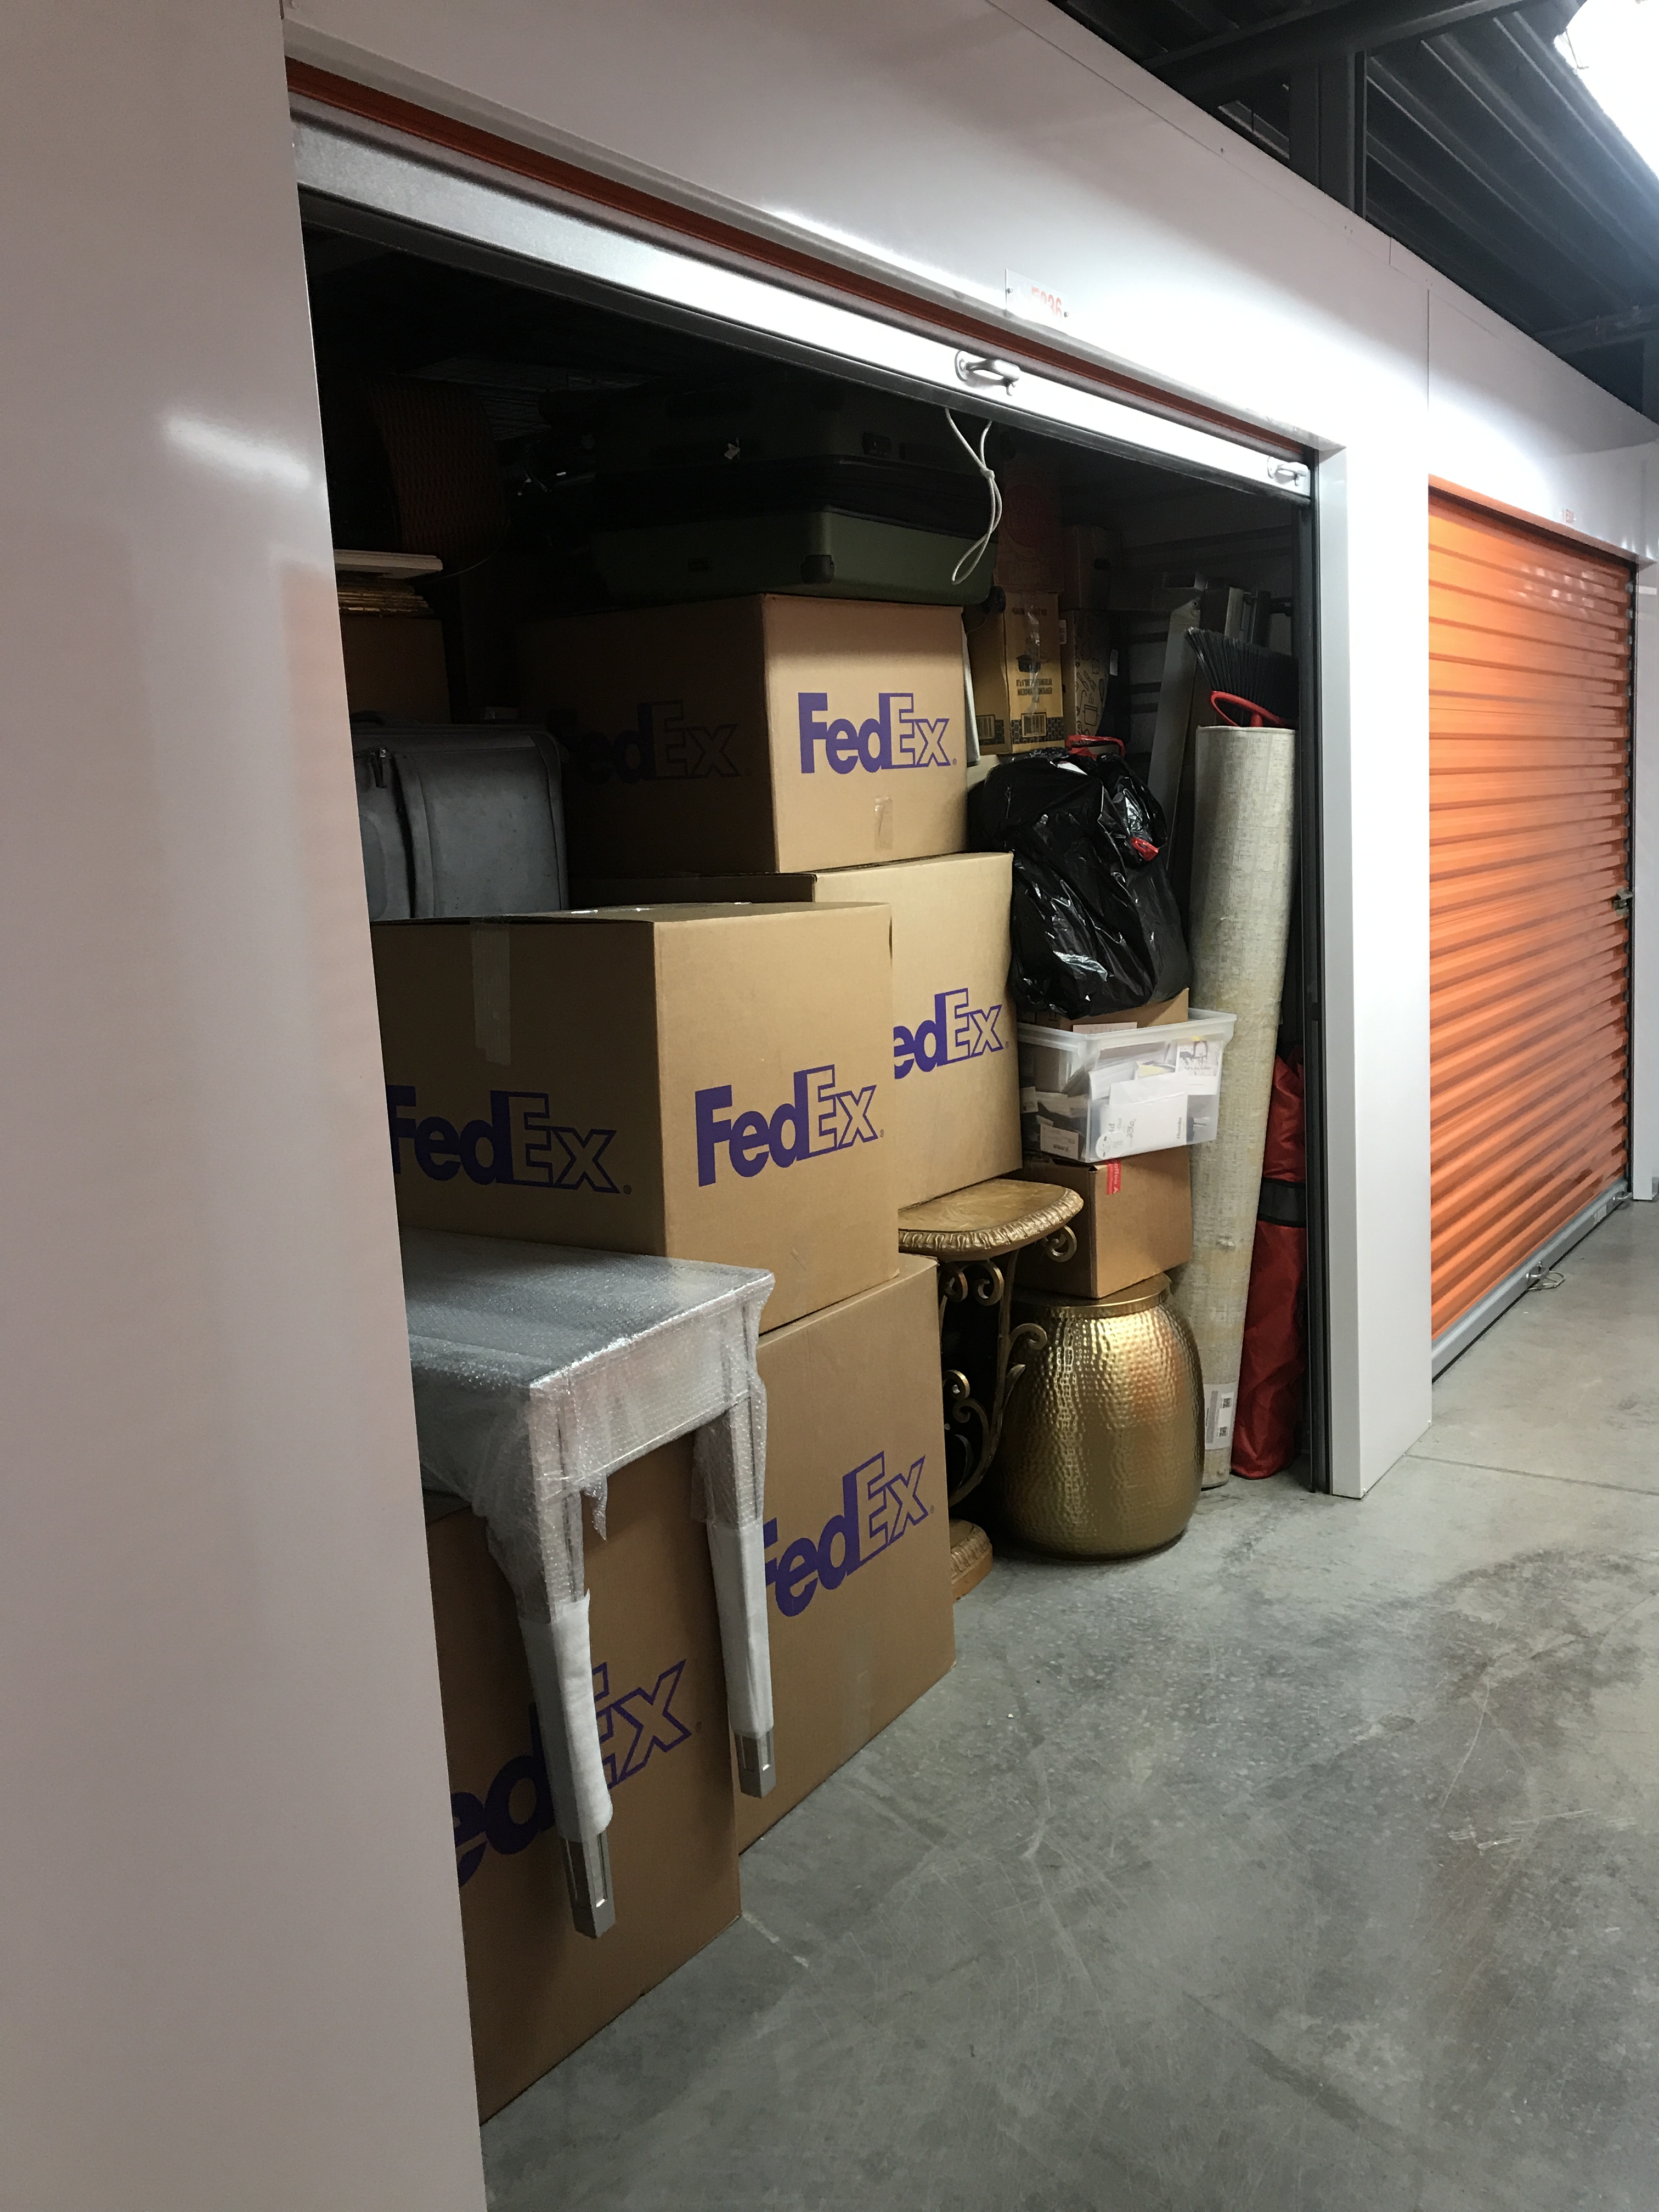
Luckily, I’m a badass at Tetris…
For those who don’t own and can get out of their lease: This was much easier than I thought it would be. I was living in Denver, CO and shopped prices online for about a day and before I decided on a Public Storage in Aurora, CO. Quick Tip: If you live in a major city, look in the suburbs for a better deal. For a 10×10 climate controlled unit they gave me the first month for just $1 + insurance and each month after is about $100/month. The facility was very new, clean and secure, so overall I was very impressed with what I got for the price. Seven Brothers Moving did a phenomenal job and I finished storing my entire material life on March 19th, 2019. Below you can see pictures of the 1 bedroom apartment that is in the 10×10 unit. I wanted to include these apartment pictures in order to show you how much stuff I had to store. But no, honestly, I just loved that apartment, so I’ll just mourn it here…


Step 9: Store or sell your car
This was one that I changed my mind on a dozen different times. If I was absolutely certain that I would only be traveling for only four months, then I would have paid $125 per month for a parking spot at my brother’s apartment complex in Denver. I feel like this is something people don’t think about when they look into storing their car, as they usually just shop different car storage facilities. However, depending on where you live, if you have a friend who can lease an extra parking spot through their apartment complex it could save you some money. In my case, it would’ve saved me over $100 per month versus storing it at a car storage facility in the suburbs.
It is possible that I will travel for longer than 4 months, so I decided to sell my car to Carmax.
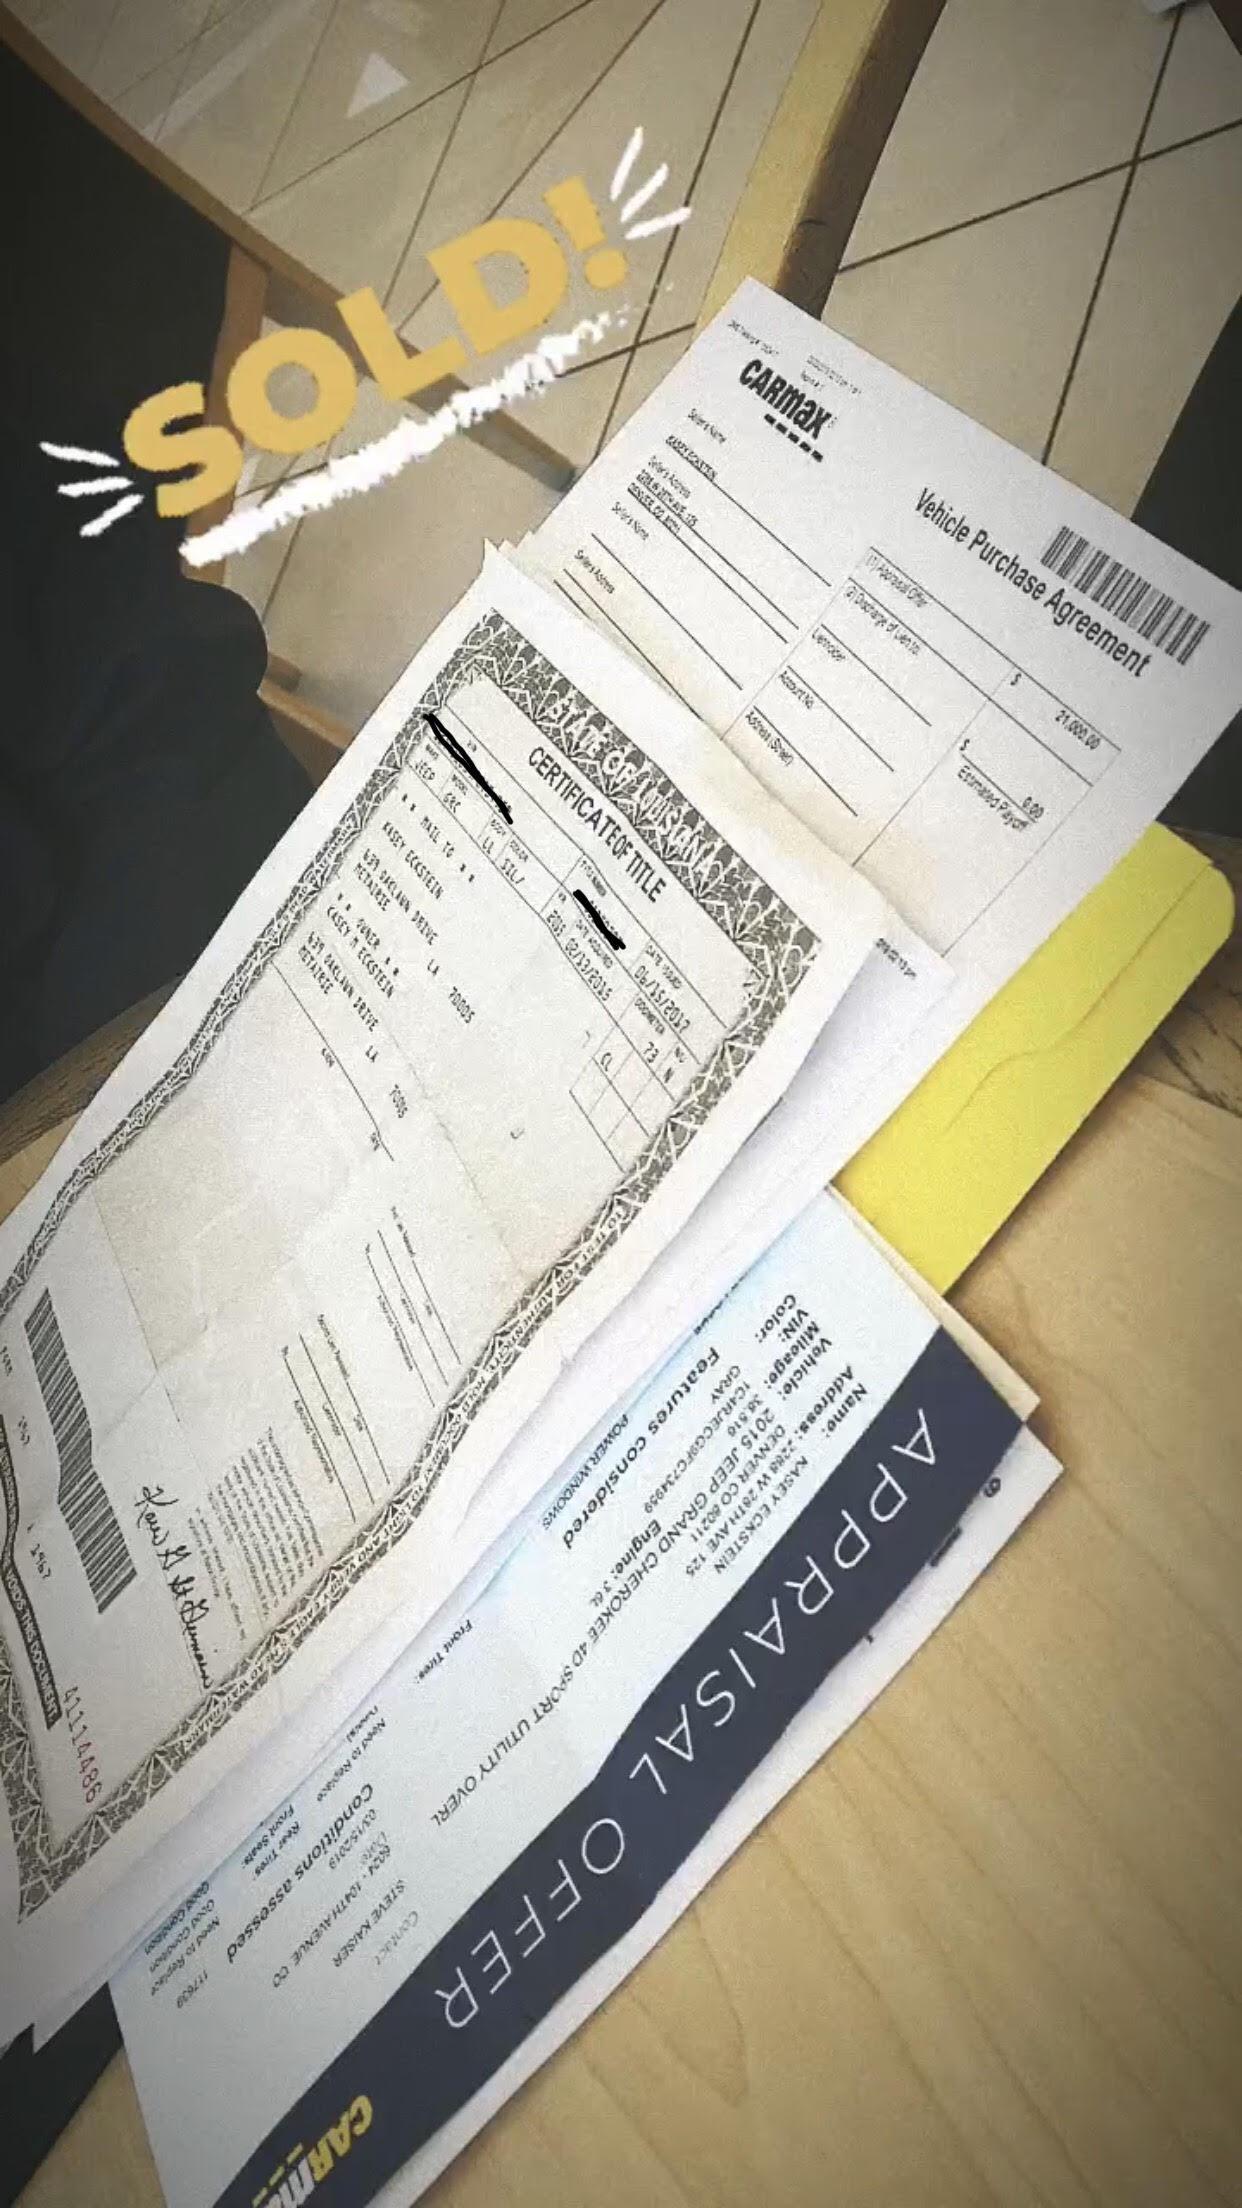
I only had the time to shop my Jeep out at two different dealerships, but Carmax quoted me $3,000 more than their competitor down the street. Carmax will give you a cash offer that is good for 7 days so I got it appraised, used the car for my move, drove it to the dealership the day I was flying out, sold it, got an Uber to the bank, deposited the check and then took an Uber to the airport. Being able to use it right up until the day I left was enough reason to not sell it privately!
To make sure you get a fair price market value you should use Kelly Blue Book. Lastly, make sure you get your car appraised at more than one dealership because the offers fluctuate from dealership to dealership depending on what they have on their lot.
Step 10: DON’T MISS YOUR FLIGHT!
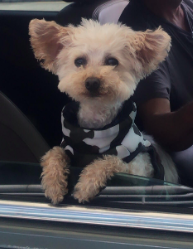
This is pretty much every single thing I did to start backpacking as a responsible adult. I did leave out that due to strict international pet policies I had to find a dog-sitter for my dog, but luckily this wasn’t much work because my dad and stepmom are watching him for me. Here’s a pic of him staring at me in confusion as I was being dropped off at the airport… yes, of course I cried saying goodbye to that angelic face!
Thanks for reading!
You can follow the whole adventure on Instagram:
@KaseyEckstein

What a wonderful experience! How I wish I could have had an opportunity to do the same. Enjoy, take millions of photos, and be safe! Looking forward to following all those amazing places. ❤️
~Cris
LikeLike